Built-in Shelves DIY – How We Built Them

A white, flat wall is what loomed behind the desk in our home office. Boring to look at, a stark zoom background…it needed a change. Since this is a room we use daily, we decided to make this one of our next DIY projects.  Built-in shelves with storage? Absolutely.  We brainstormed some high-level goals for the space – something masculine, plenty of storage, rich color, and a “library” feel.  As with the other rooms in our house, The Arched Manor, it had the light oak flooring that we refinished, substantial baseboards, and white paint.

Table of Contents
    Add a header to begin generating the table of contents

    Affiliate links may be used throughout this blog post – read our policy here

    Research and Design

    We had just finished the renovations in our pantry and dining room, and we wanted to incorporate some of those elements into this space (such as the inset cabinets, monochromatic paint, etc.).  We sunk our teeth into Instagram and Pinterest, and compiled our inspiration for our new office design.  Since we are visual people, we utilized SketchUp and V-Ray to create a 3-D model and renders of the space with built-in shelves.

    Our Original Home Office

    To give you a visual of what our office looked like before we began the renovation, here are a few pictures that show the “basic” space.  

    SketchUp 3-D Model & Renders

    SketchUp is a lifesaver when planning cabinetry and built-ins.  We can create the room to the exact dimensions, and then experiment with different cabinet size combinations and styles to get the look we want.  We can also determine how many shelves we need above the countertop and how high we need the picture frame lights to be mounted. 

    Our Design Approach

    We have been into large-scale items recently, and at the center of this built-in we left a large space for a singular piece of art.  We needed it to be big and fit the masculine theme of the room. We found the Chateau Lamonte on Perigold and purchased it right away (the shipping time was a few months out). 

    To the sides of the art, we wanted shelf towers that spanned all the way to the ceiling, with picture frame sconces at the top.  We wanted the “built-in” look, so we designed these units to have the same crown molding as the entire room, and the same baseboard molding on the cabinets. 

    Use Pre-Built Base Cabinets

    Cabinet constructions is a skill that not only takes a lot of patience and planning, but also a lot of time and tools.  To speed this project timeline and to ensure we had a quality product at the base of our built-ins, we opted to purchase the base cabinets from CliqStudios instead of building them ourselves.  We went with their inset cabinets in 24″ depth, and after tinkering in SketchUp, we determined that two 30″ drawer units on the ends and two 36″ door units in the middle would give the balanced look and functionality we needed. 

    Office Cabinet Built-ins in our home office! The base cabinets arrived from CliqStudios.

    We went with CliqStudios because that is what we used in our Pantry and Dry Bar, so we knew they were good quality and it would give us the look we wanted. You could also use cabinets from other stores/manufacturers as well, such as Ikea, Lowes, or any other online cabinet retailer.  

    Electrical Planning & Rough-ins

    Planning for electrical is one of those steps that many people overlook at the very beginning of constructing built-in shelves, but it’s absolutely essential!  For us, we listed out some electrical wants/needs for this space: 

    Identifying all of these ahead of time meant that we could hire an electrician to wire them correctly.  Any preliminary electrical work should be completed before the job begins. We had ours ensure the outlets were installed where we needed them (some floating so we could attach them to cabinetry when installed), and run the 14/2 cable from the new switch up to the top area of the room for the sconces (where the cabinets go).  

    Office Cabinet Built-ins in our home office! Electrical rough-in for home office.

    Installing the Base Cabinets

    The base cabinets are the first thing to install in this space and the biggest thing to remember is that they all need to be perfectly level, since the upper built-in shelves rest directly on them. If you need help with this, we give detailed instructions on how to find the high point of your floor and adjust the heights of your cabinets in our DIY Office Built-In Guide.   It’s always a good idea to remove the doors and drawers in this step so that they don’t get damaged during installation. 

    Office Cabinet Built-ins in our home office! Base cabinet installation done!

    Countertop Material and Installation

    We tossed around several ideas for the countertop of our office built-in shelves: quartz, marble, wood (mahogany or elf), etc.   We chose to go with painted butcher block for a few reasons:

    • Budget Friendly: The cost is roughly around $300, which is a bargain compared to a custom wood slab or natural stone. 
    • Readily Available: We were able to pick this up at Home Depot (in-stock).  
    • Having a stained wood may compete too much with the wood floor and the wood desk.  

    The installation was fairly straightforward – we required two 72″ butcher blocks that we cut to fit our space.  The hardest part was scribing our cuts to fit the bowed walls (so there would not be a noticeable gap between the countertop and the walls). 

    Office Cabinet Built-ins in our home office! Assembling the butcher block counter on the base cabinets.
    Office Cabinet Built-ins in our home office! Joining two butcher blocks together.

    Shelf Tower Construction

    We used 1×12 boards purchased at Home Depot for our shelf towers. We used cabinet screws and wood glue to ensure a secure fit, and the beadboard we used as a backer was glued and nailed, which increased the strength and structural integrity of the unit. We made these shelves about 2″ lower than the ceiling so that we had enough of a gap to left these on top of the countertops.  

    Shelf Tower Installation

    Installing the cabinet towers required a team lift, as these things are heavy and awkward! They sit flat on the countertop and are secured to the wall using the mounting bracket at the top. Wood glue and screws are a must for these shelf towers. 

    Office Cabinet Built-ins in our home office! Constructing the upper panels of the unit.

    Upper Panel Construction

    For the area at the top of the built-in shelves, we wanted an inset panel framed by molding with a sconce centered in the middle. We created these inset panels out of cabinet grade plywood with 1×3″ trim boards on top.   

    Sconce Placement & Electrical

    Measuring for the electrical box location was a bit of a challenge given the many trim pieces, overhang, and spacing that we needed, but we honed our 8th grade math skills and eventually found the correct locations. We pulled 14/2 wire through the upper sections of the built-in and installed the old-work electrical boxes on the panels.

    Office Cabinet Built-ins in our home office! Wiring electrical box to side of upper cabinet.
    Office Cabinet Built-ins in our home office! Paint prep.

    Facia Trim

    We used two different sized fascia boards for the built-in shelf units – the vertical and upper horizontal pieces are 1×3” whereas the horizontal pieces on each shelf are 1×2”.  We originally had 1×3” for these pieces and after installing the first few, we quickly realized the look was too chunky, so we removed them before the glue set and installed 1×2” instead.  This just goes to show you that no matter how much you plan ahead using SketchUp and renders, sometimes as you are physically building or installing, you need to make changes, and that’s OK! 

    Office Cabinet Built-ins in our home office! Upper shelving unit.

    Crown Molding

    The crown molding we used matches the rest of the house – it’s a custom three piece design that spans about 11 inches from the ceiling. We installed this on all the walls in this room (was not here originally).  People always ask if it’s easy to install crown molding, and the answer is always “no”, but having the right tools helps and the more you do it, the easier it becomes.  A good Compound Miter Saw, a Crown Fence, laser level, and nail gun are essential. Also, if you are doing this yourself, a support pole is really helpful for loosely holding one side of the crown in place while you position and nail the other side. 

    Office Cabinet Built-ins in our home office! Installing Crown Molding.
    Office Cabinet Built-ins in our home office! Ready for Paint.

    Baseboard Molding

    For the baseboards, our home has a custom two-piece design on the first floor, so we incorporated that into the built-in.  Since we used pre-built cabinets, ours came with a toe kick, which makes it a bit of a challenge to secure baseboard molding to the façade of the cabinet.  What we do in this situation is create baseboard blocks that secure to the toe kick and allow the baseboard to sit flush against the front.  Full instructions on how to make these can be found in the DIY Office Built-in Guide. Baseboard molding and crown molding are great ways to elevate your DIY built-in shelves!

    Paint

    Paint can make or break a project, so if you are not a confident painter or don’t have the tools to apply a professional job, you may want to consider outsourcing this step to a professional. 

    Prep Work

    Once construction was complete, we prepped the unit for paint. This meant that all the nail holes had to be filled in with wood filler, caulk applied to crevasses and joints, and bare wood sanded smooth.  After wiping the entire area down to remove any dust, we began prepping for spraying paint.  This required using plastic sheets to tarp the area inside the base cabinets.

    How We Painted

    This room would feature a monochromatic paint job. This means that the walls, trim, and cabinetry would all be painted the same color.  We did opt to have the ceiling in white, as we find this does lighten the space a touch, while keeping that moody look we were going for. 

    The first step when painting is to paint the ceiling a flat white. We used the Graco X7 Paint Sprayer for this job, and we used an extension arm so that we could reach our high ceilings with ease. Once the flat white paint was fully dry, we tarped off the ceiling area tightly. 

    Office Cabinet Built-ins in our home office! Painting the ceiling.

    The walls and cabinetry first received a coat of high-quality tinted primer.  Since we were painting the room a dark color, using the tinted primer was helpful and helped to reduce the chance of us having to paint a third coat.   We used Roycroft Bronze Green from Sherwin Williams.  For the cabinets, windows, and trim, we used an eggshell finish. For the walls, we used a matte finish, which does a better job of hiding imperfections and softening the space. 

    Office Built-in Shelves in our home office! Primer on the doorway.
    Office Built-in Shelves in our home office! Primer applied to cabinets.

    Installing the Picture Frame Lights

    We chose brass picture frame lighting for our built-in shelves.  We used the 18” long lights on the sides and the 30”, double base unit for the center.  We connected these lights to our favorite Caseta Dimmer in black.  If you are using a dark color, we recommend replacing all your outlets and switches with a dark (black) color.

    Office Built-in Shelves in our home office! Installing the sconces

    Hardware Installation

    The hardware we chose for the drawers was a 9” wood bar with a brass mount.  It also has a matching backplate, which gives is a really structured look that we like.  For the doors, we used a brass latch that matches the brass tone of the lights and drawer pulls.

    Final Results

    We love how these DIY built-in shelves with storage turned out! What do you think? Let us know in the comments below! 

    Office Built-in Shelves in our home office! Right shelf detail.
    Office Built-in Shelves in our home office! Straight-on shot.
    Office Built-in Shelves in our home office! View from right side of office.
    Office Built-in Shelves in our home office! Left shelf detail.

    Frequently Asked Questions

    Roycroft Bronze Green by Sherwin Williams

    The first shelf is 1’ 7” from the countertop.

    Yes! Adding built-ins to your home increases the value and makes your home more desirable to other buyers. 

    Sometimes, but thing to remember here is that you want a sturdy shelf that is going to last 20+ years. You do not want to purchase a cheap MDF shelving unit only to have it start sagging and bowing after a few years of use. Using cabinet-grade 0.75" plywood, wood glue, and screws is a great way (and affordable) to create a strong shelf unit. 

    Plywood - it will hold up MUCH longer than MDF, especially when weight is applied to the shelf. 

    We recommend 0.75" solid wood and/or cabinet-grade plywood. Any thinner than that and you will be at risk for bowing/sagging. 

    Shop The Room

    About The Authors

    About The Authors

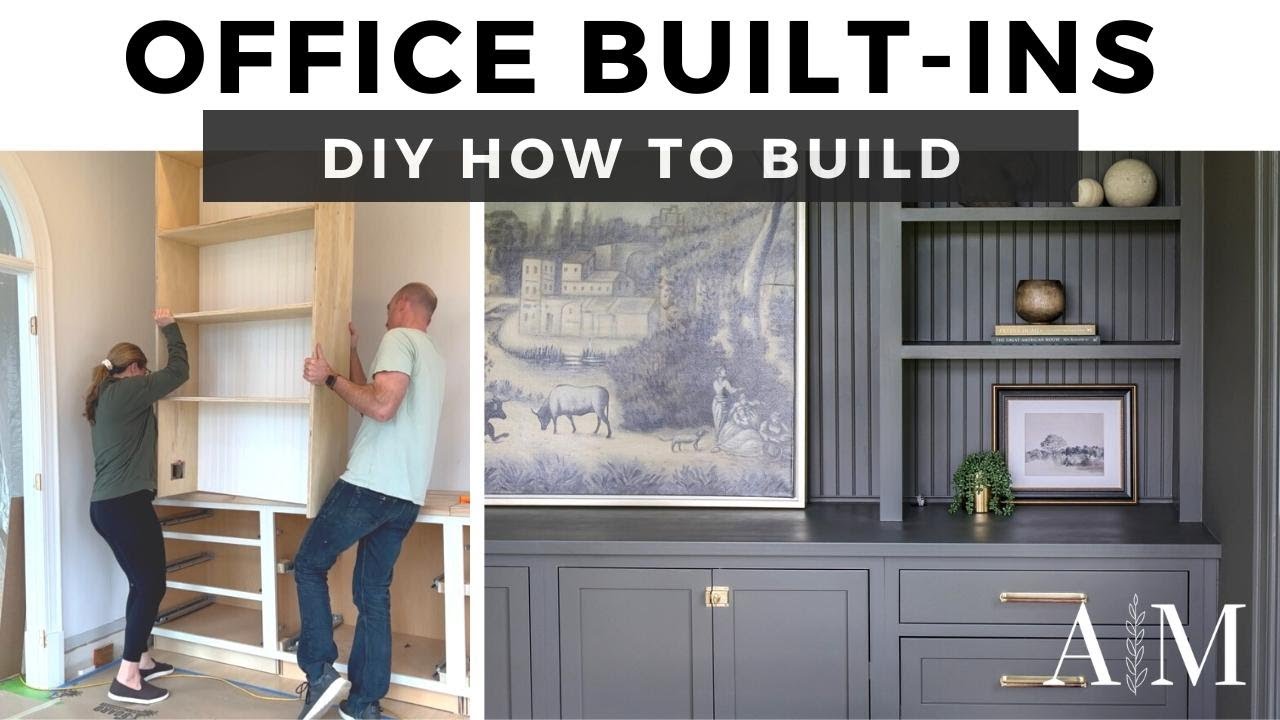
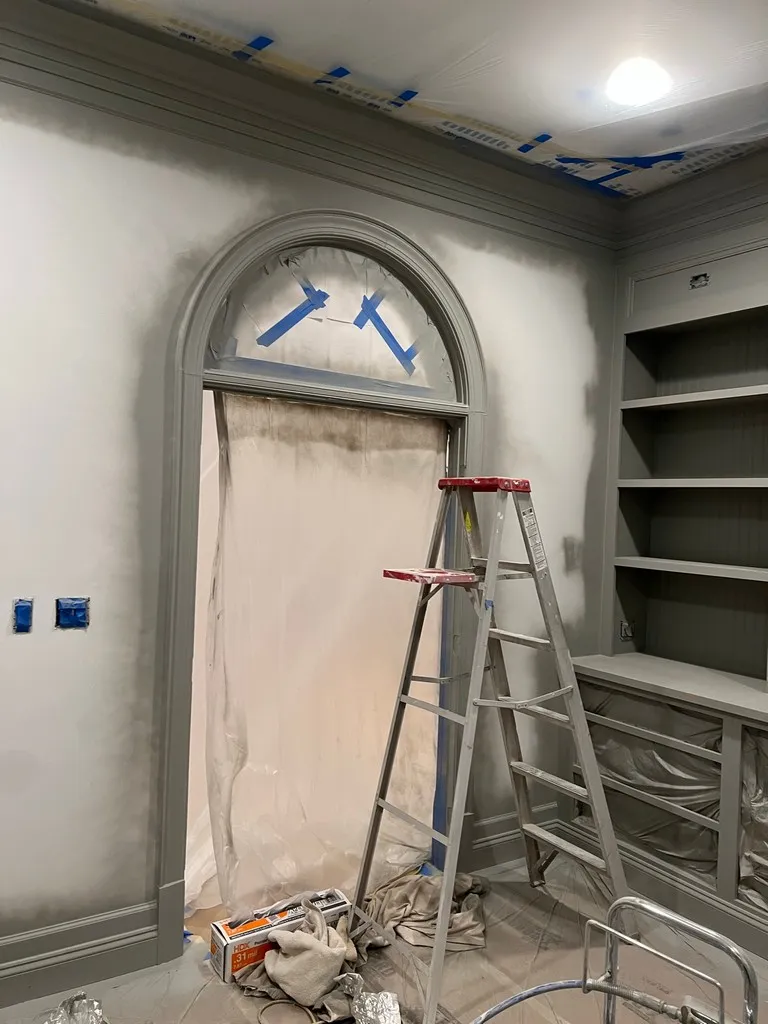
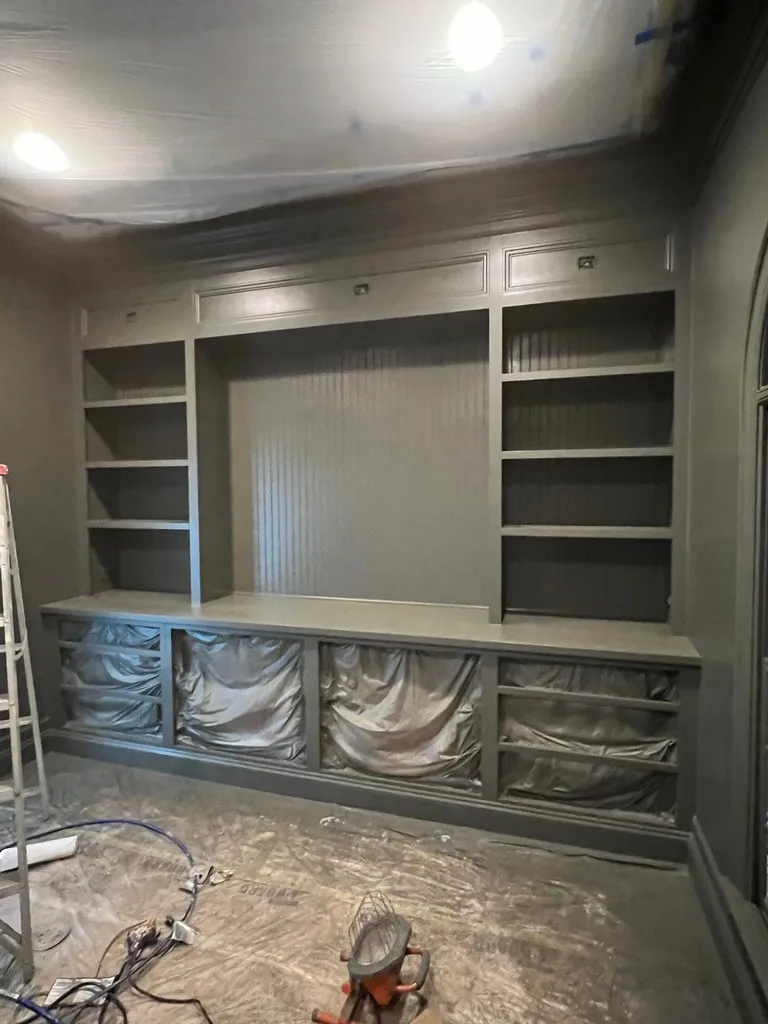
    John and Megan are the founders of Arched Manor, which is a passion-project turned business featuring home design, renovations, DIY tutorials, décor, e-Design, and 3-D rendering services. This married couple lives in Leesburg, Virginia, and is currently renovating The Arched Manor, a brick colonial house built in 2000.

    Learn More

    Leave a Comment

    The Comments

    • Rick Kaplar
      November 10, 2022

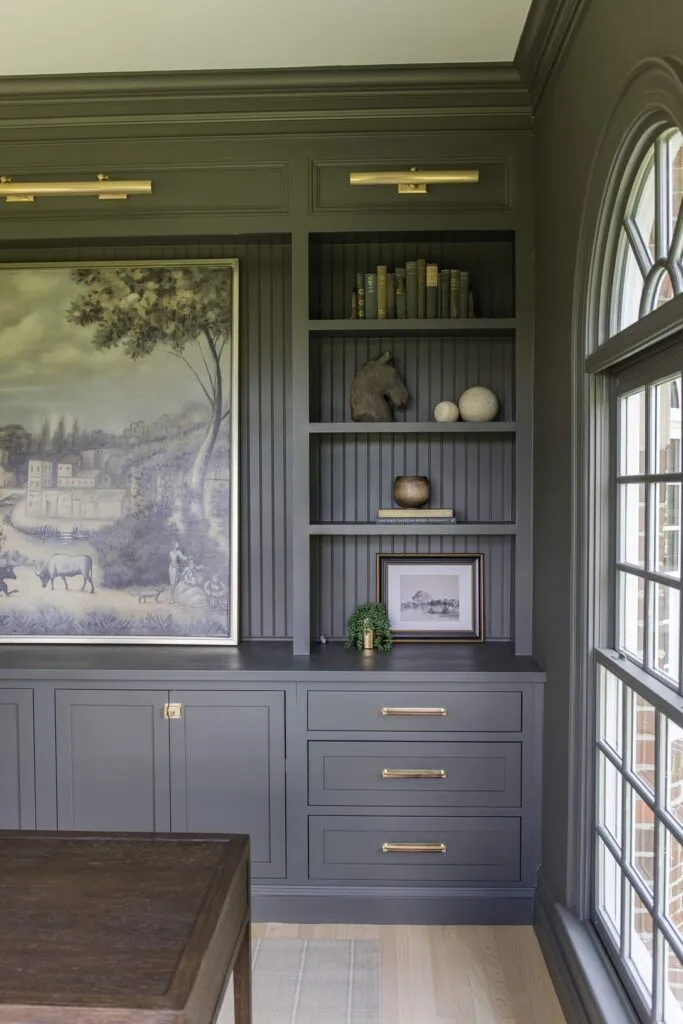
      A terrific project – and a great video about it!

      • 1021home
        → Rick Kaplar
        November 10, 2022

        Thank you! One of our favorite projects so far. 🙂

    • Kathy S
      November 14, 2022

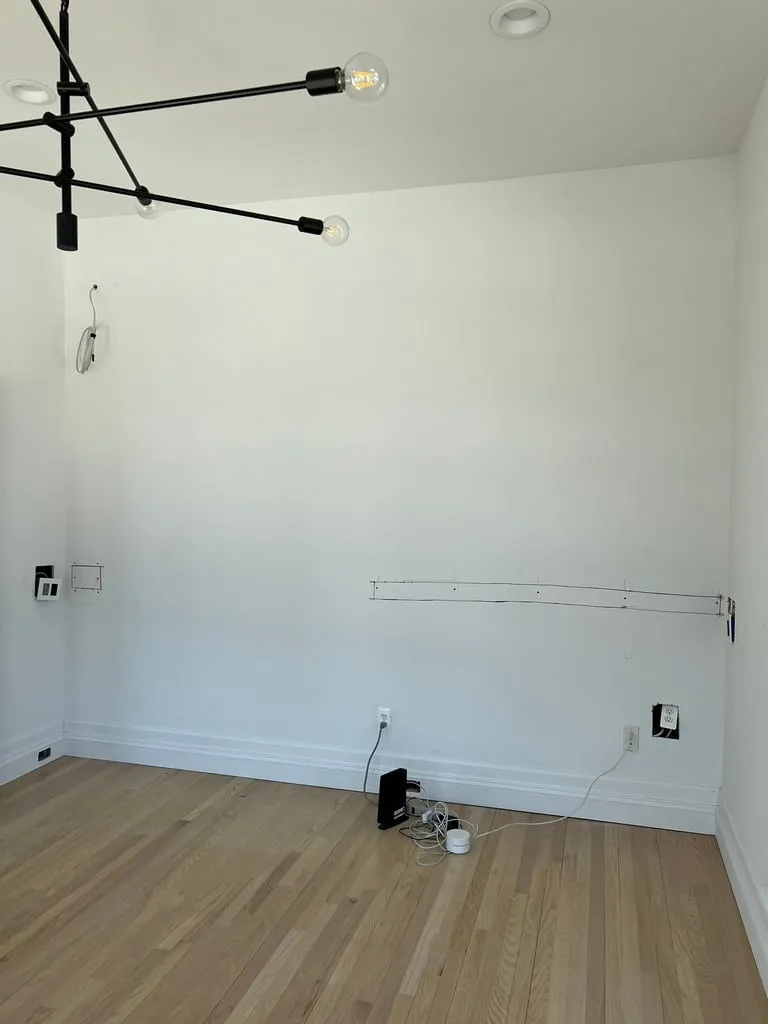
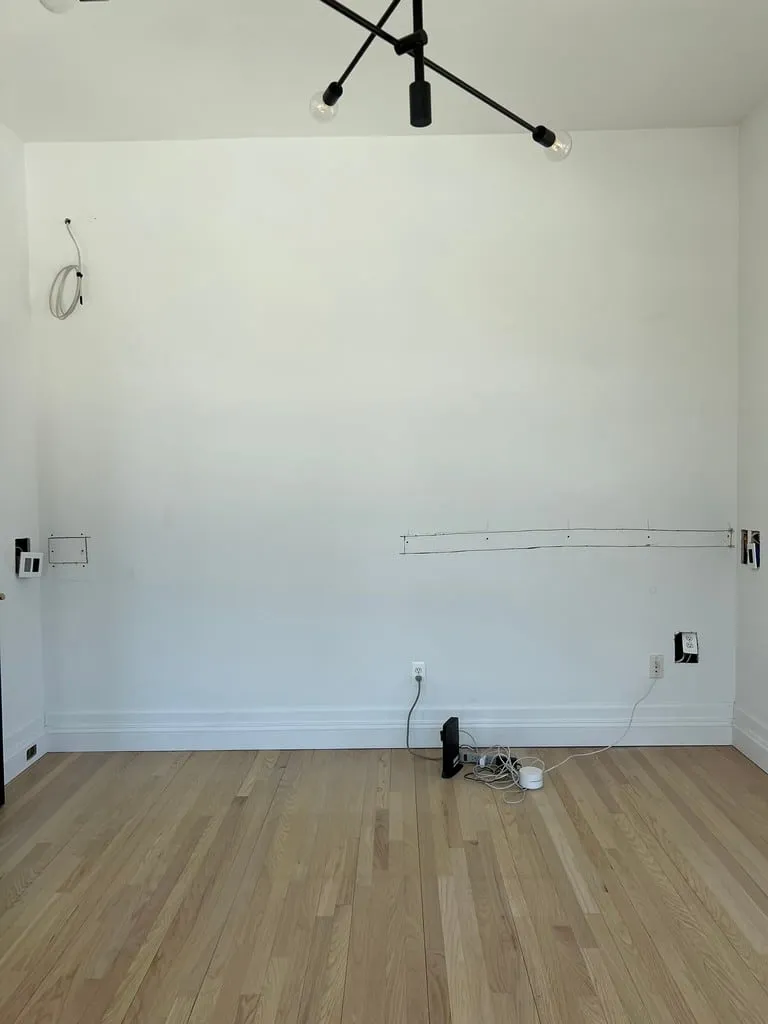
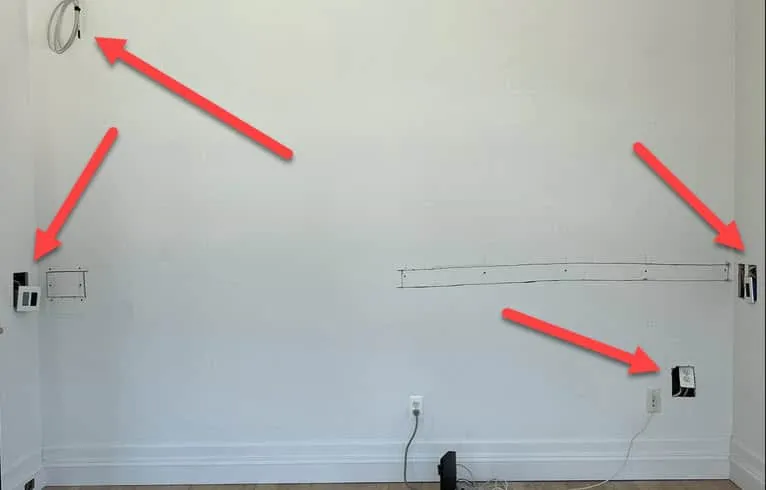
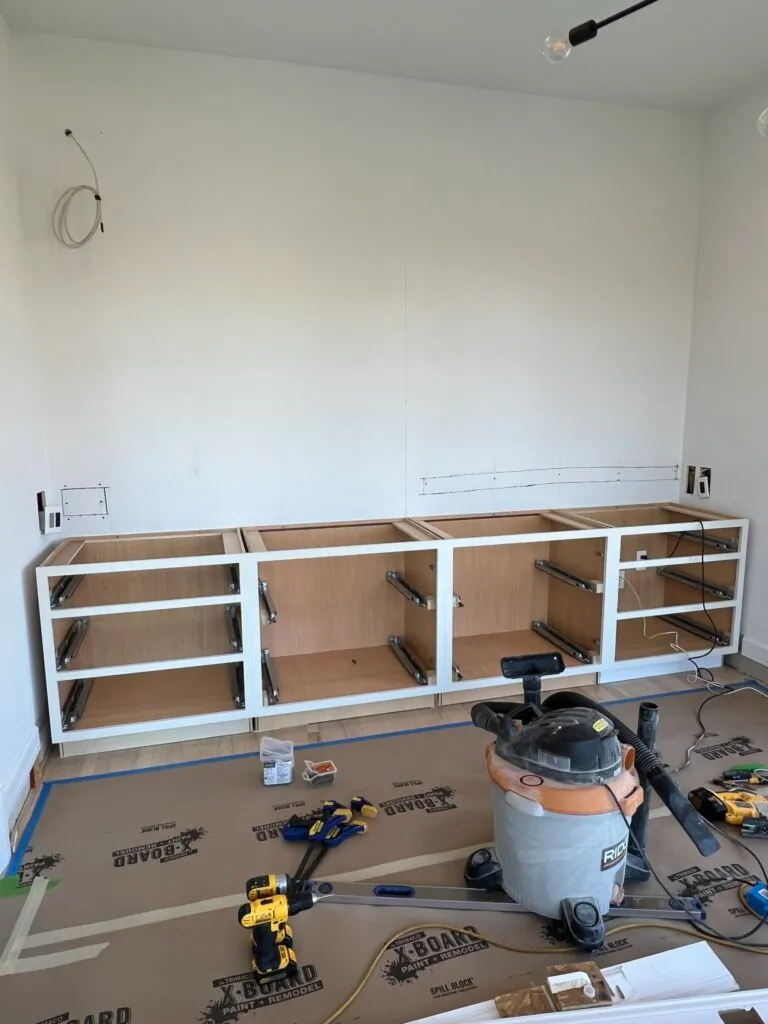
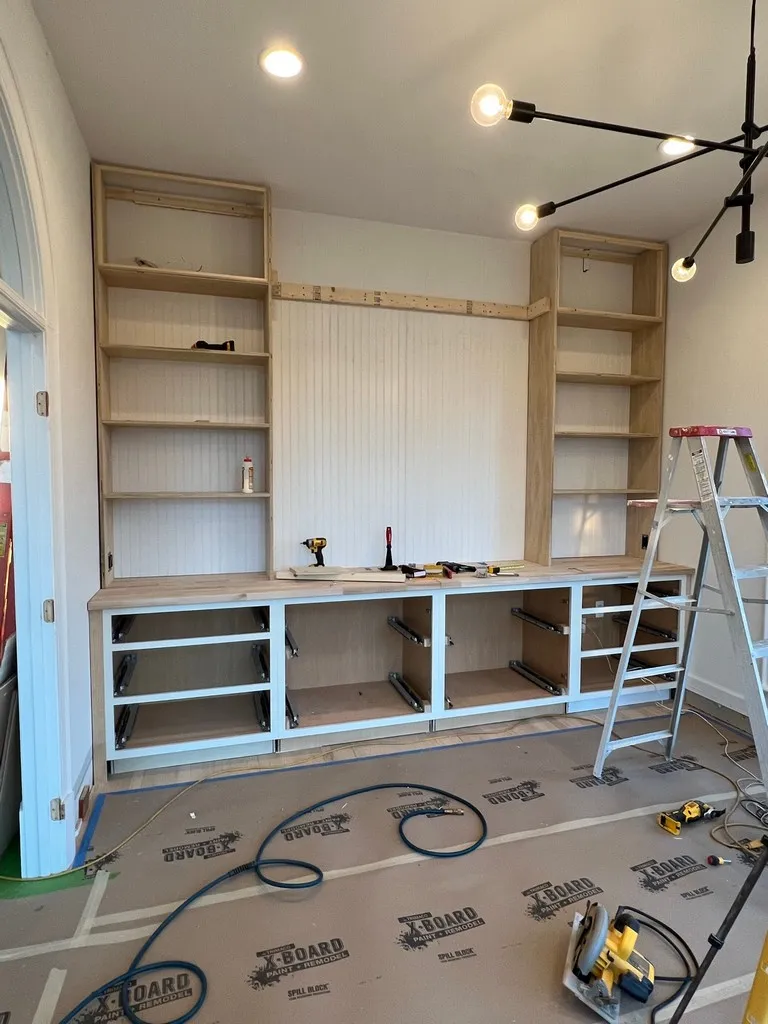
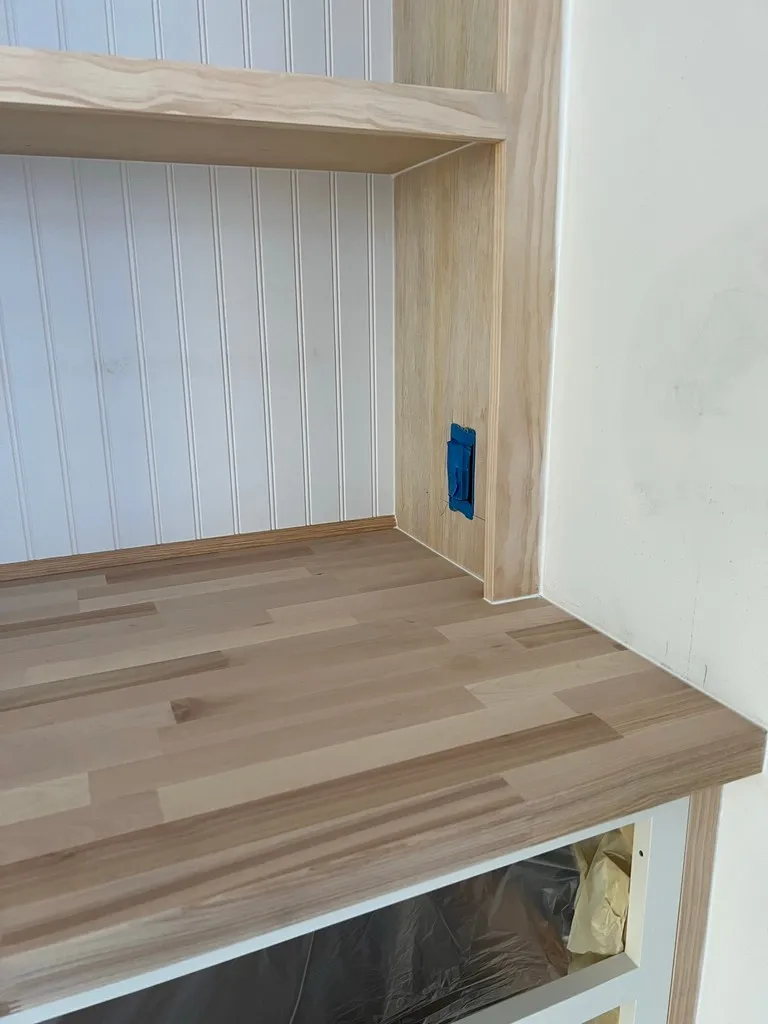
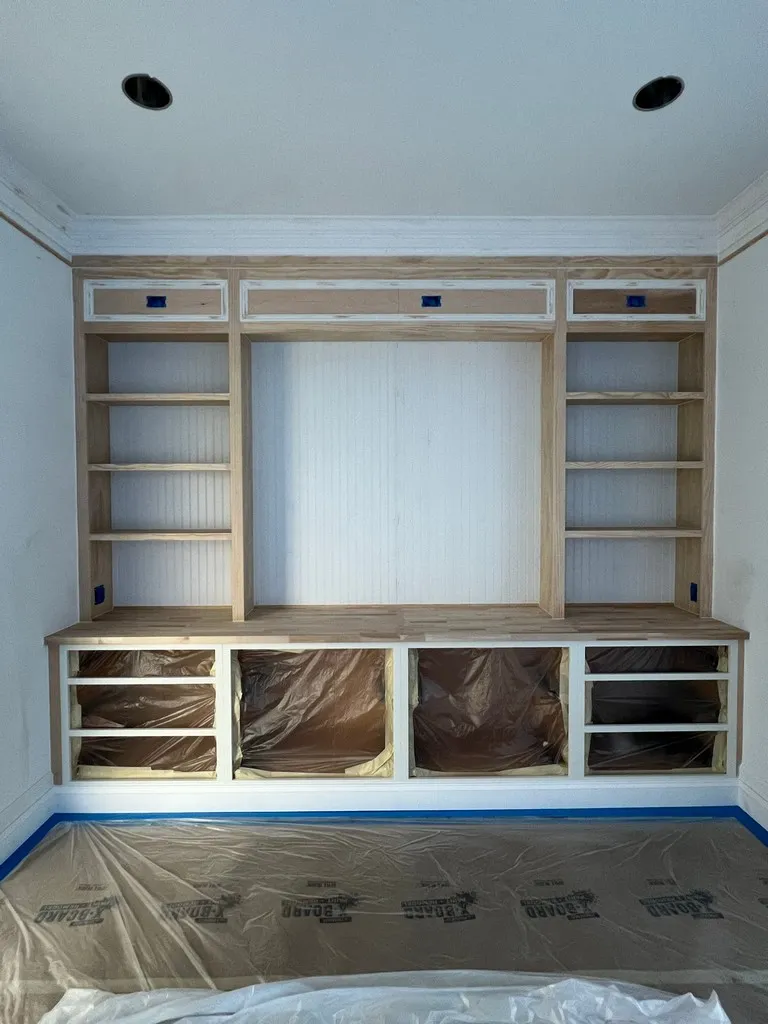
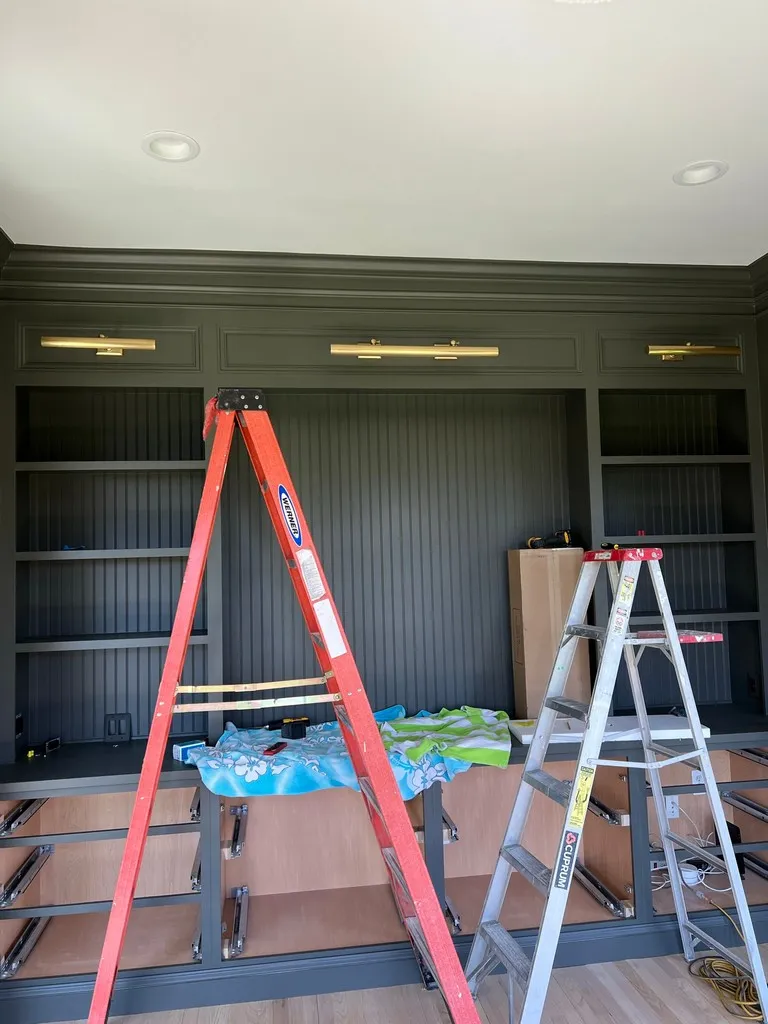
      How did you get power to the lights at the top? Did I miss a step that showed you adding the wiring?

      • 1021home
        → Kathy S
        November 17, 2022

        We had an electrician run a new switch and wire to the upper sections, and then I used that and wired three electrical boxes into the cabinetry above. The YouTube video shows that process a little better. Thanks for the question!

    Meet Megan & John

    Hi there! We’re a married couple with a passion for DIY, decor, and home improvement! We’re currently renovating The Arched Manor in Leesburg, VA.