Refinish Red Oak Flooring – How to Make it Like White Oak
Click to watch the full video!
Click to watch the full video!
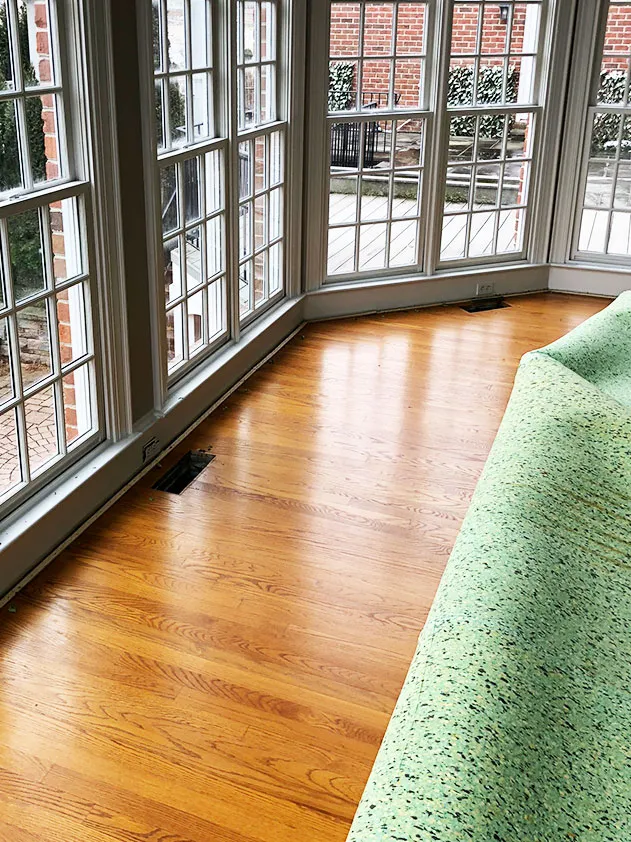
When we bought our current house, we inherited a red oak floor that spanned most of the first floor and the entire second level. Our house was built in the early 2000’s, and red oak and rich cherry were very popular choices at that time. Fast forward 20 years and people are spending big money to remove the red elements from their homes. However, you can remove the “red” in many of these elements for a fraction of the cost of replacing by painting or refinishing. Ready to learn how to refinish red oak flooring? You’re in luck – read on to learn how we did it!
Table of Contents
Add a header to begin generating the table of contents
Affiliate links may be used throughout this blog post – read our policy here.
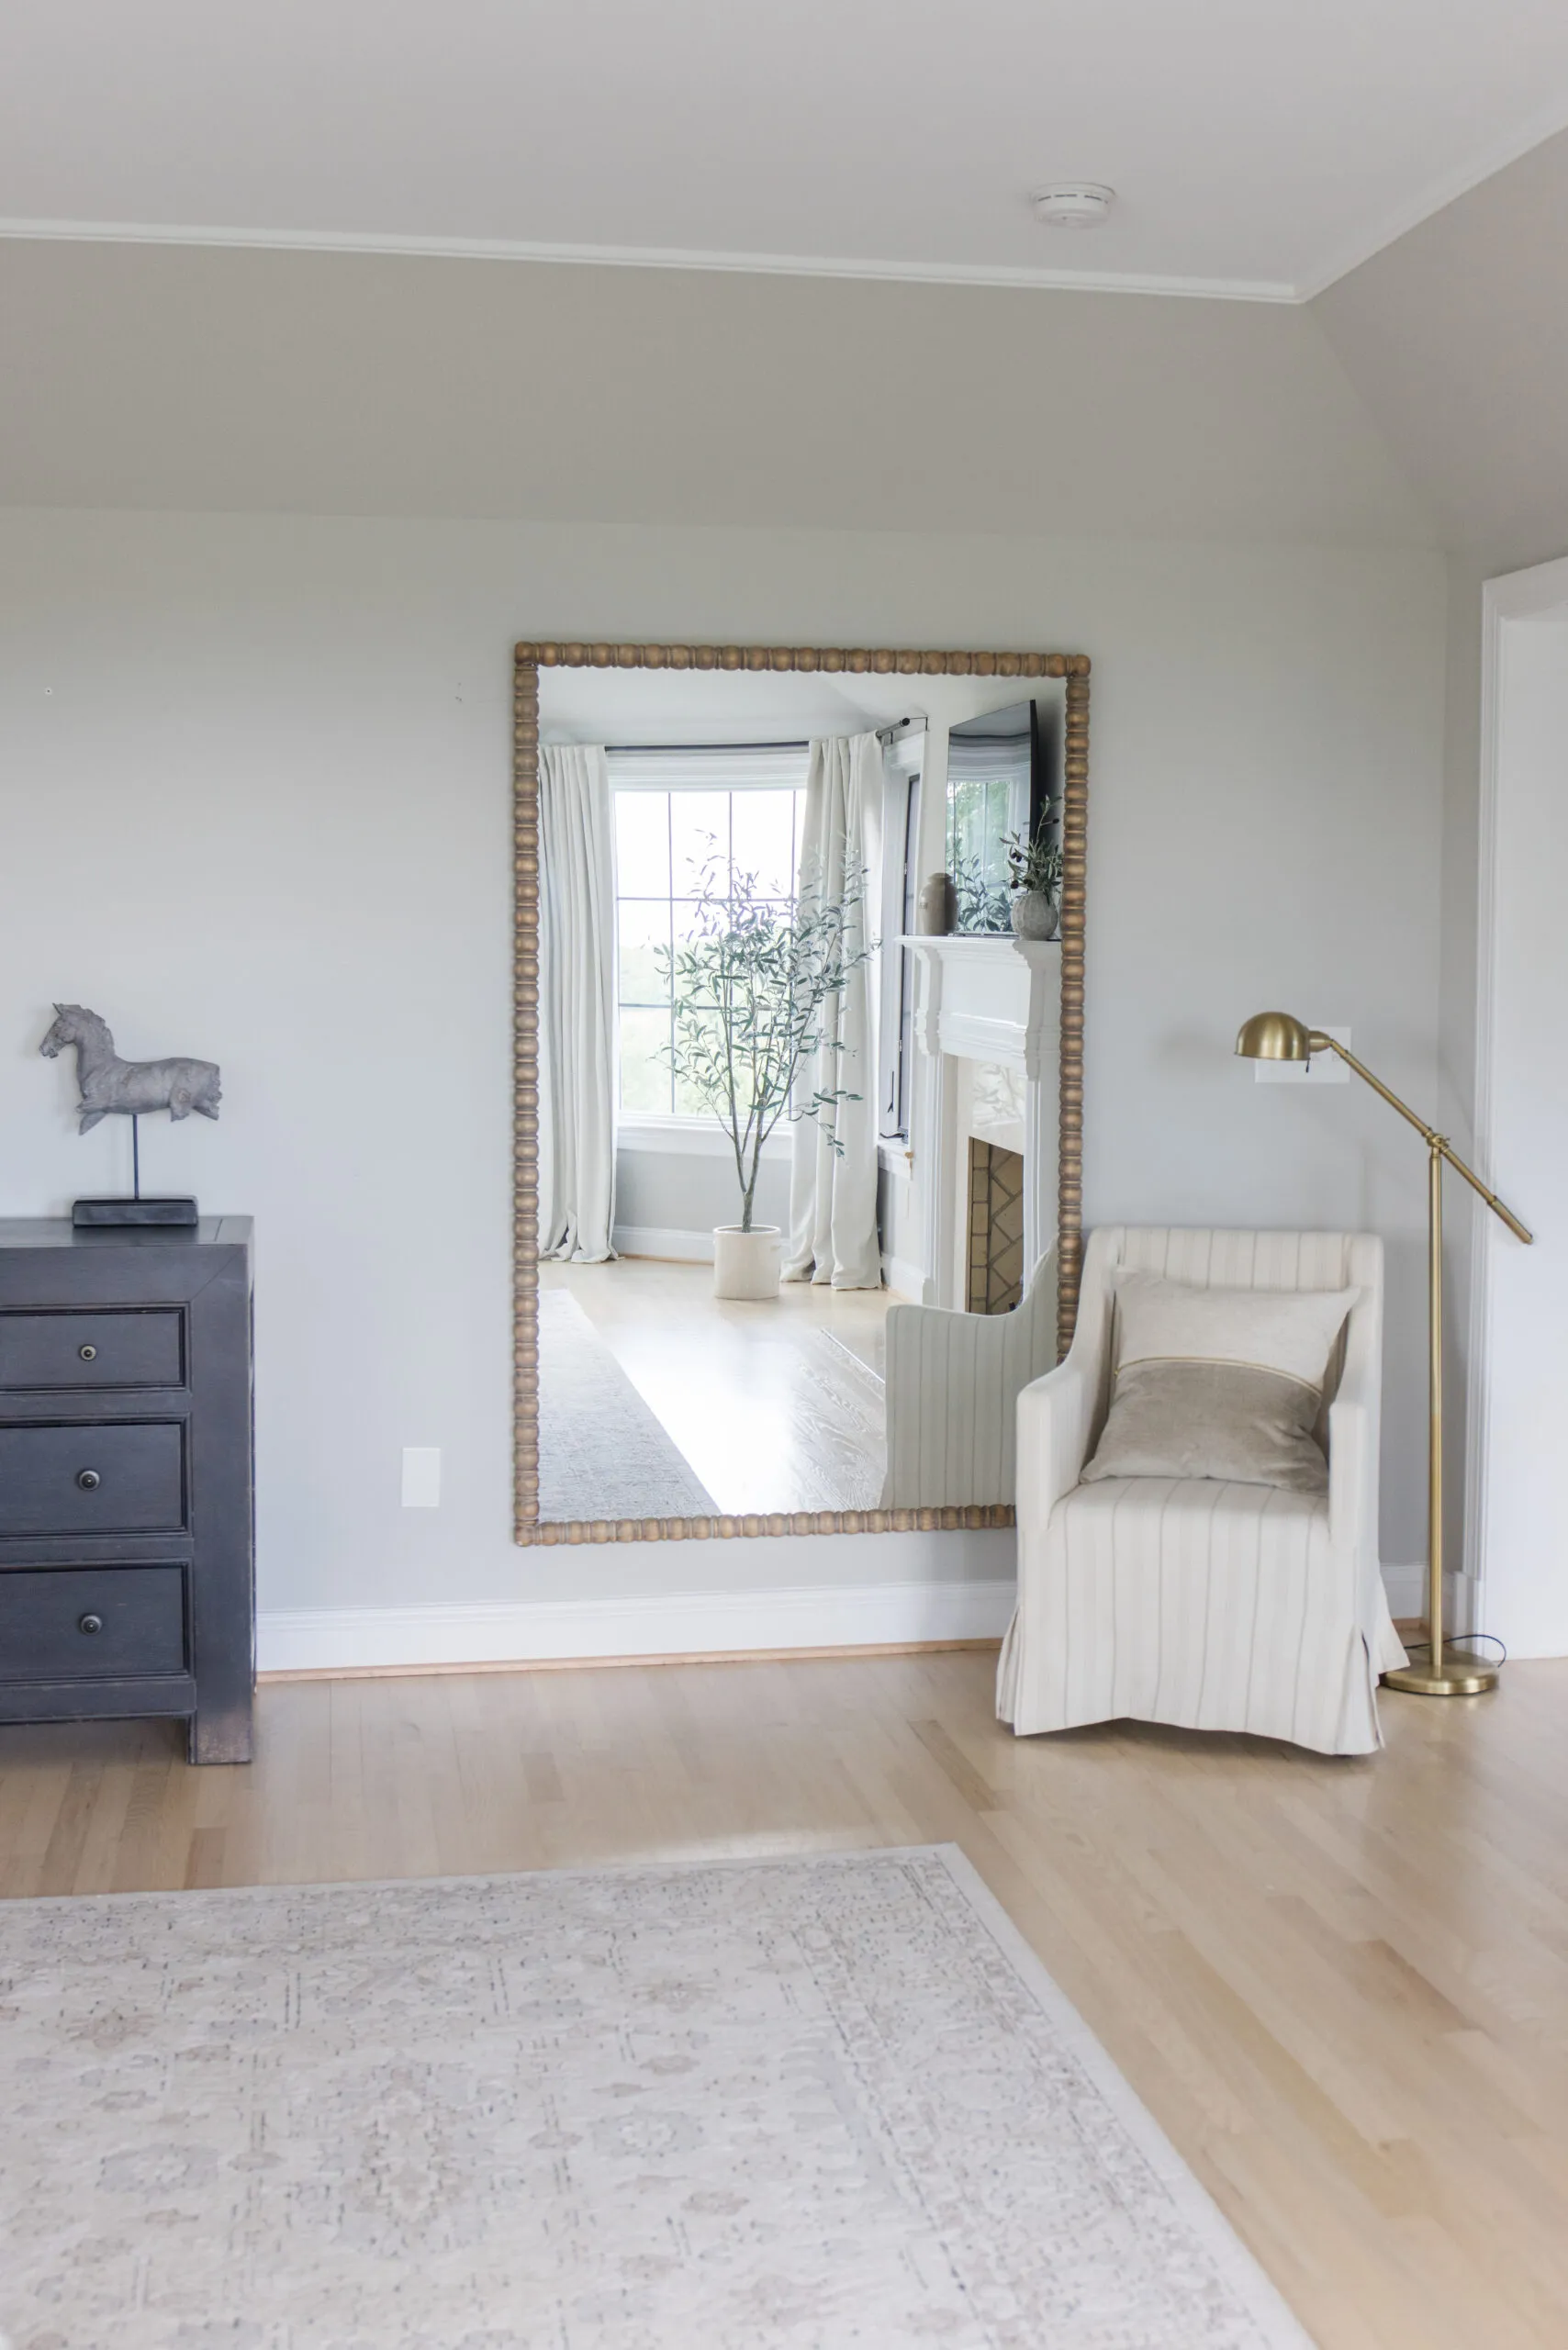
We really like the look of white oak– it’s warm and inviting without being overly red. If we wanted to rip up the existing red oak and replace it with white oak, it would easily cost six figures. Instead, we did our research and found out that we could get close to the look of white oak by sanding the red oak and applying a white wash. We decided to go for it and spoiler alert, we are so glad we did!
However, we want to share some of the things we learned (the hard way) and the products that we used. The below 5 steps are designed to help anyone looking to refinish a wood floor, no matter what wood species or stain is used, but I will highlight the products and process we went through when refinishing red oak to be less “red”.
Research Online
Use online resources such as Pinterest, Houzz, and Instagram to see what other people have done to refinish their floors, and what products they use. Find a few examples that you like and keep the links or save them to you phone so you can show your contractor. Examples that list the products they use are best – the more detail you can provide your contractor, the better.
Hire a Good Contractor
This is perhaps one of the most challenging parts of the process, and definitely one of the most important. A contractor can make or break a refinishing project, so finding the right contractor, at the right price, is key. Use online resources such as Angi, Yelp, and Google (reviews) to find a wood floor contractor that specializes in refinishing. There are many contractors that can rip out a floor and install a new one, but refinishing an existing floor is more of an artform, and experience matters.
Always get at least three quotes (more is better) and select a contractor that offers a fair price, and one that you get a good vibe from. Show them pictures and products of the look you want (from step 1 above) and make sure they understand what you want. The contractor we chose had many positive, recent reviews from previous customers (on Angie’s List), and they arrived on time to give their quote. They were also very responsive (via texts and calls) when I had questions about their quote or their services.
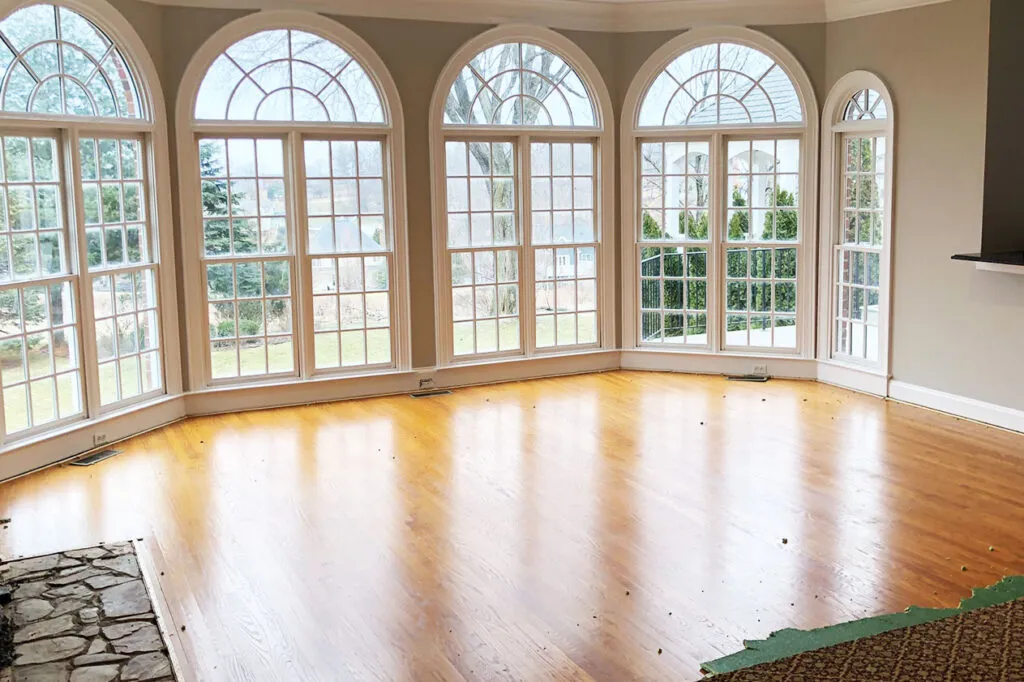
Sand and Prep the Existing Red Oak
Watching the sanding machines strip the old stain or paint off a wood floor is one of the most satisfying things to watch! Make sure your contractor sands all the nooks and crannies around walls, stairs, and doorways. If you have any water damage in certain areas or other imperfections, now is the time to replace those boards and fill the imperfections with high-quality (stainable) filler. If you are considering extending your wood floor into other rooms, now is the time to install it. For our project, we removed the dated marble in the entryway and powder room and installed matching red oak to create a consistent look on the main level. This is where a good contractor can be a huge asset – having one that knows what wood to use to perfectly match your existing floor is key.
Find the Right Stain and Sealer to Refinish Red Oak
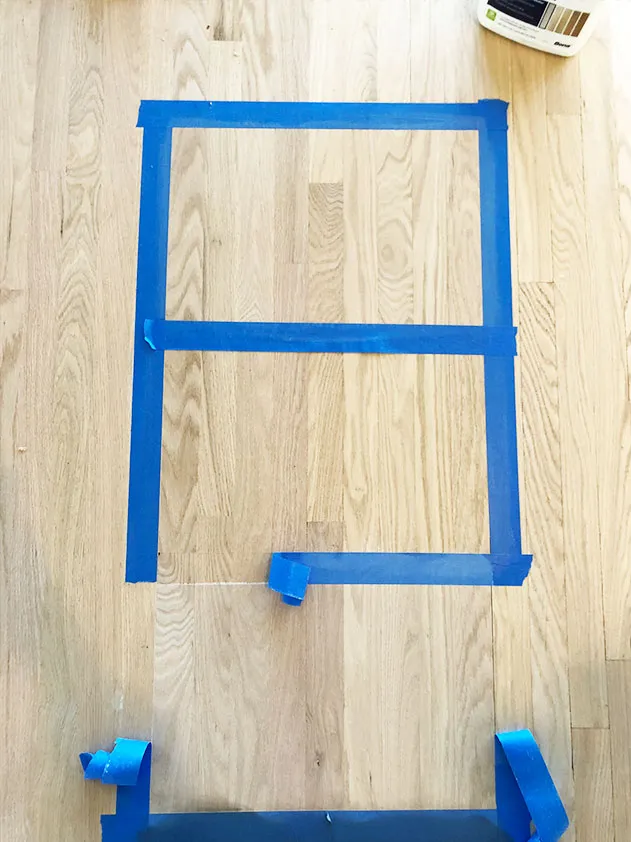
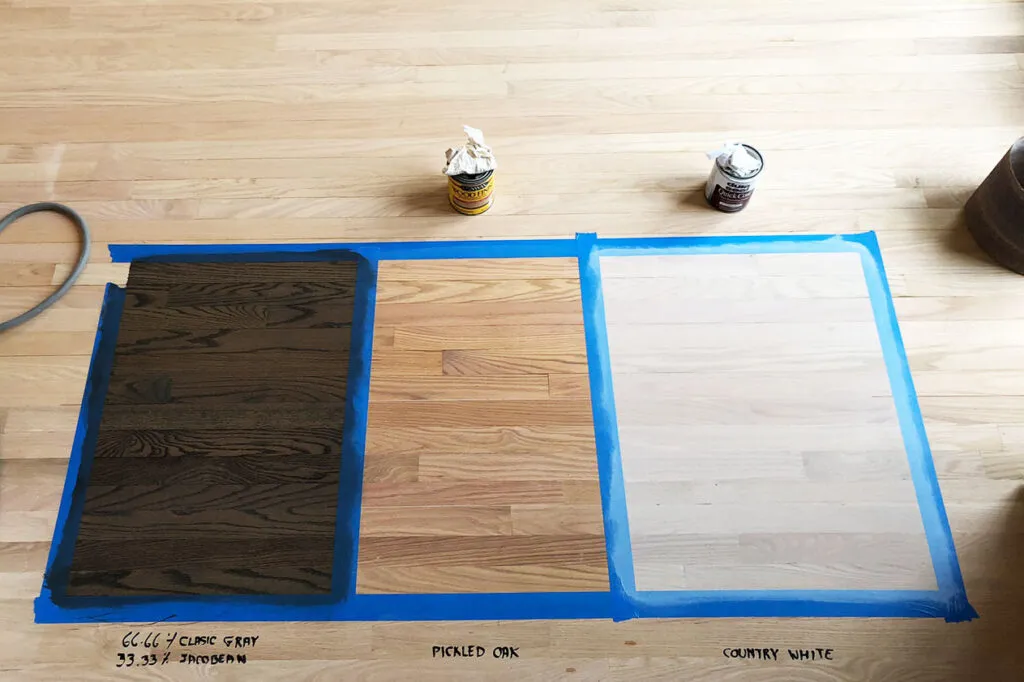
Use painters tape to create squares on your floor in several areas of your home. Have your contractor apply the stains so you can see what you like best. For our red oak, we went through quite a few different combinations of stains before settling on the one we liked best. It is important in this step to take your time deciding – you will likely feel pressured by your contractor to select a stain as soon as possible (so they have time to order it so they can complete the job). But this is a HUGE decision that can be very costly if you end up choosing a stain you don’t like, so don’t rush.
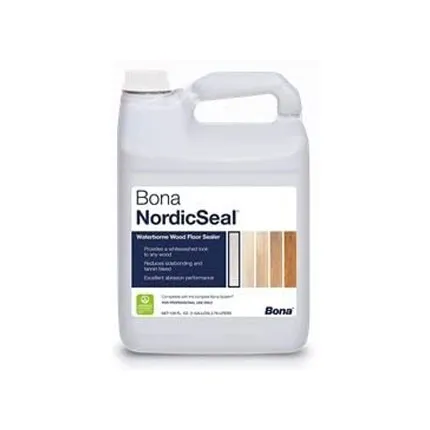
For our project, the contractor mixed some options for us and applied them in our sample squares. Some stains were mixed with others, while others were diluted to be lighter in tone. Ultimately, we went with two coats of Bona NordicSeal and topped with one coat of Bona Traffic HD Satin finish. The NordicSeal is a great product for red oak – it safely “bleaches” the wood and removes the harsh red tones. The more coats you apply, the lighter it becomes.
For the finish, use a water-based product, not an oil-based product which can yellow from sun exposure over time. The water-based products are also much easier to work with. One of the big trends right now is matte finishes, and this is what we “thought” we wanted, but after a slight debacle (more detail about that in the next step), we realized that the matte look for flooring just looks unfinished and consistently dirty. A satin sheen is still soft enough for our taste but looks finished and clean.
Application Quality is Key
Many products have to be applied in a certain way or with certain tools/applicators. Make sure your contractor knows how to apply the products you selected. Application quality can make or break your final product, especially in an open concept floorplan or large expanse of hardwood. Stay on top of your contractor! We have a big tip to share for this step, but before we give it, let me give you the back story on how our contractor gave us a two-tone floor.
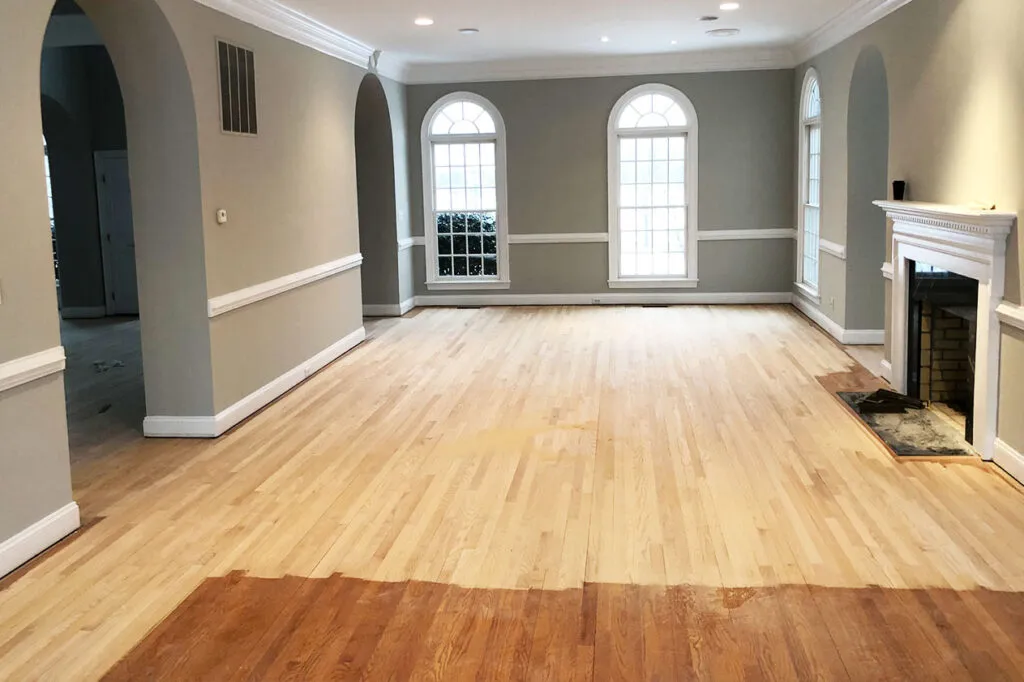
Our Two-Toned Floor Story
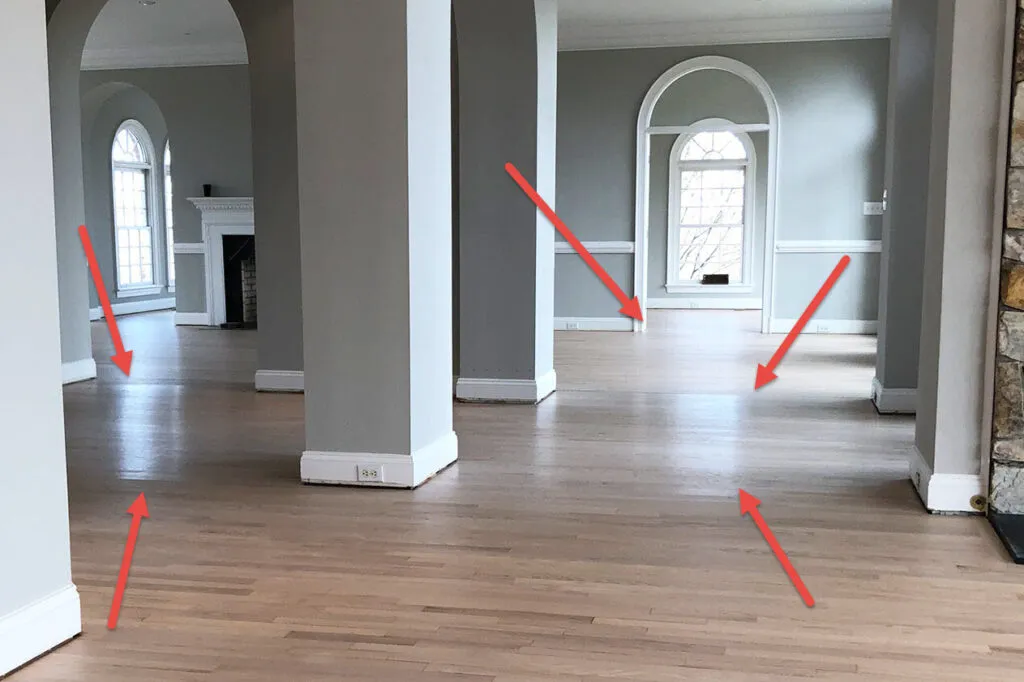
We were on a tight timeline – our goal was to have the floors finished before moving day. The contractor was scheduled to apply the Bona HD sealer two days before we moved in, so it had time to cure completely before the movers walked all over it. They texted and said they were done, and the next day I drive out to the property to inspect the floors and found that some rooms had a matte finish, while others had a satin finish, and a clear line could be seen. Check out the pictures below. Obviously, this was a big problem since we were moving in the next day. Long story short, we had to move in and a week later, move all the furniture to the garage so the contractor could sand the top finish off the floor and reapply the sealer.
This was actually a blessing in disguise because in the week that we lived with the matte floor sections, we realized just how much dirt they showed and how unfinished they looked. We had the contractor apply the satin sealer when they came back to redo their work. However, what they did this time to ensure a consistent finish (this is our big tip) is to mix all the containers of sealer in one big container/barrel before applying. Apparently, there was enough variation in the many containers of sealer (all labeled as the same matte finish) that it dried differently when applied. Mixing everything together ensures that the product will be consistent across your entire area.
That’s it! We hope these 5 steps (and the tips and products below) help you in your refinishing project and if you have any questions or comments, please leave them in the comment section at the bottom of the page.
Tips
Spend the time to find a good contractor. Research online, read reviews, talk to friends, family, and realtor to see if they have any recommendations.
When selecting your contractor, pay attention to if they show up on time to give a quote, and send them texts and/or call them to see how responsive they are. This trait/quality in a contractor is crucial in a project like this.
Stay on top of your contractor during the entire process and ensure their quality meets your standards. Don’t be afraid to show them areas they missed or that you want redone.
If you want to extend your wood floor into other spaces, this is a perfect time to do it.
Don’t feel pressured by your contractor to hurry and select a stain/finish. You are going to live with your decision for years to come, so make sure you spend the time to evaluate the sample stain in different locations and at different times of the day.
Ensure all nooks and crannies are sanded before the stain is applied.
Use a water-based stain to avoid any yellowing in future years.
Avoid high-gloss finishes – they were common in the 1990’s and 2000’s, but are now out of fashion.
Before applying your sealer, combine and mix all containers into one large container/barrel before applying. This will ensure a consistent finish across your entire floor.
Unless i missed it in the article I didn’t see how you got the redo oak to look white. Did you bleach the floors with a particular agent? If the first photo is the finished product could you kindly elaborate on the process and selection of stains/sealants? That color is exactly what my wife and I are looking for.
Thank you and happy new year!
1021home
→ daniel r setnikar
April 12, 2021
Thank you for the question! The Bona NordicSeal acts as a bleach – the more coats you put on, the lighter the floors become. No stains were used on these floors. The sealant we used is Bona HD Traffic and does not affect the color of the wood tone. Thanks!
Robin Vachon
→ 1021home
November 14, 2021
I am selling my house, which was built in 1950. Almost the entire house has white oak flooring with oil base poly, which as you mentioned has yellowed in the sun after recently being refinished. Here’s the problem: we accidentally purchased red oak to replace the one room that had carpeting. When the contractor we hired separately came to install it, he noticed the wood was different but didn’t say anything. Now we want to refinish the red oak to get it as close as possible to the rest of the house. Sanding and applying oil base poly darkens the red oak, but you can tell the floors are different due to the red veins. Any ideas?
1021home
→ Robin Vachon
November 17, 2021
Hi Robin – Sorry to hear about this predicament. Honestly, you are probably not going to match white oak and red oak very well when they are placed side by side, especially with an oil finish on the white oak. I know it stinks, but the best option is to probably replace the red oak flooring with white oak. Also, the oil finish on the white oak will yellow as the months/years progress, so even if you match it initially, it will likely not match as the stain matures. The absolute best option here would be to replace the red oak with white oak and sand and refinish all the flooring, then apply a water based stain/finish. That will produce a consistent look and won’t yellow as the sun hits it. Good luck!
Niki Chev
March 10, 2021
Hello! I love your floors! I am trying to achieve the same color in my home which has red oak floors. I was hoping you could answer a few questions…
Did you use a satin under the nordicseal?
or
Did you leave the floors natural after sanding and then added the two coats of nordic seal and 1 coat of bona HD traffic?
Thanks so much!
1021home
→ Niki Chev
March 15, 2021
Thank you for the question! The Nordicseal is similar to a bleach – the more coats you put on the lighter it becomes. We did two coats of that directly on the raw wood (no stain). We then applied the Bona HD Traffic on top of that, and that’s it!
Niki Chev
March 10, 2021
stain** not satin
Megan Hansen
April 8, 2021
Do you have any current pictures of your floor that you can share. Or have you notified the floor darken or yellow over time?
1021home
→ Megan Hansen
April 12, 2021
Thank you for the question! The floor color has remained consistent in the 2 years since we refinished them. Water-based products do not change color with exposure to sunlight, so these floors should remain pretty consistent for years to come. 🙂
Erin Brown
June 2, 2021
Your floors look beautiful! Thank you for sharing your process. We just added Red Oak to our kitchen and Family Room and will be refinishing the existing floors on the first floor next week. Our contractor planned on using Bona DriFast Stain and I was planning on doing mixture of White/Natural to try to eliminate the pink and yellow tones. Did you try that before deciding to go with the NordicSeal? Sounds like your way may be the easiest way to get this beautiful natural look of white oak. What did you do with your existing banister on your staircase? Did you do this same process on your stairs? I’m considering using a gel stain on the banister and stairs in a gray/brown color, with white balitsters and risers. I would keep my stairs the light oak color, but am afraid the banister won’t match. Our house was built in 1993, so it definitely needs refinished. You ended up using the Satin topcoat, correct?
1021home
→ Erin Brown
June 12, 2021
Hi Erin! We did not try the Bona DriFast stain, but we did try other white and gray stains (diluted with water). The problem with those was that it looked “beachy”, like we were whitewashing the floor. The NordicSeal is like a bleach, so it still keeps the wood feel, but removes the red tones. I highly recommend it! We did the same process on the banister and rails. And yes, we used Satin as the topcoat – the matte finish just showed too much dirt (always looked dirty) and we are extremely happy with the satin finish. Good luck with your project!
Thank you so much for this article It helped me so much in my decision making.
1021home
→ Moorpark
July 7, 2021
You are so welcome! Glad it helped you out!
Ramaiah Chowdary Gummalla
July 6, 2021
we are in the process of putting new read oak hardwood floors due to water damage and sand & stain the rest of the floor which are already installed. we had darker ( antique brown) before and we would like to go with the same approach like you guys did ( bleach the read oak) and we would like to go for grey stain as well. Does this work ? Also we would like to paint walls. what type of paint and finish have you used on the walls
1021home
→ Ramaiah Chowdary Gummalla
July 7, 2021
Thank you for the questions! I don’t know if that will work as we only did this approach on red oak and used the Bona NordicSeal and Bona HD Traffic. I suggest working with your flooring contractor to explore your options using this approach and the gray stain you mentioned. For our paint throughout our house, you can find the full list in this blog post: /paint-for-the-arched-manor/ Thanks!
Liz
August 26, 2021
I’m so glad I can across your post! Now I know exactly what to tell our flooring contractor when we’re ready. 🙂 We want to pair the lightened red oak floor with a crisp white wall just like you did. What paint color did you use? Thanks!
1021home
→ Liz
September 7, 2021
Thanks for the comment! We used McCormick Super White for our walls and trim. Good luck with your project!
Senthil Desikan
August 26, 2021
Hi – I see floor differences between old red oak floors having lines in between them due to them having grooves Vs. modern hardwood floors looks like flat surface, how deep did you sand them ? did you attempt to remove the grooves completely, if not possible – how will it look like after finishing, will the guests notice the floor difference between old and new ? Thanks for your comments
1021home
→ Senthil Desikan
September 7, 2021
Thanks for the question! Our wood floors were installed 20 years ago, so in comparison to some of the older homes (100+ years, for example), the wood grain and tone match pretty well. We did not have to sand the new wood down too much to match the existing wood. Wood is a natural product and varies in look and tone depending on location, age, exposure to sun, humidity, etc. One thing to note is that our floors are sand-in-place planks, so they don’t have the gap between each plank, which may be the “grooves” you are referring to. The grooved flooring would be much harder to match and sand so that it looks consistent. But I recommend you talk to a local flooring expert in your area! 🙂
Senthil Desikan
September 27, 2021
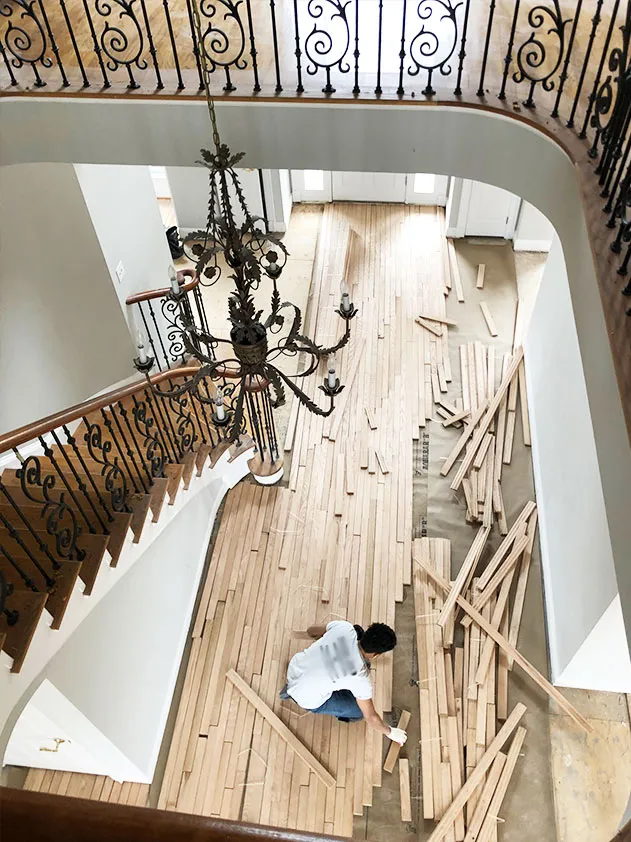
Hi – I admire the stairs and hand rail colors matching with the hardwood floor. Can you let me know the process you did to sand / refinish the stairs and hand rail. What type of paint or stain was used ? would be helpful to know – the brand name of stain / paint colors. Thanks
Joselyn Lyons
→ Senthil Desikan
November 25, 2021
I am also wondering this, please. Thank you!
1021home
→ Joselyn Lyons
November 26, 2021
Just answered above! 🙂
1021home
→ Senthil Desikan
November 26, 2021
We used the exact same products and application procedures for the stairs and handrails. Thanks!
Simone
October 19, 2021
Hi! I absolutely love your floors! I’m in the process of trying to find someone to do this to my red oak floors.
Contractors are all discouraging me telling me my floor will be pink. I absolutely want the look of your floors!
Is 1 coat of HD traffic enough? Thanks wish me luck!! 🙂
1021home
→ Simone
October 20, 2021
Thanks for the comment! I would suggest you have your contractors tape off a couple 3×3 areas on your floor and in the first square, use two coats of Bona NordicSeal. In the second, use three coats, and then compare the two. The more coats you put on, the lighter it gets. The Bona HD Traffic won’t change the color/tone, and one coat was OK for us. Hope that helps!
[…] the polished brass switch covers, and removed the lovely window treatments. When we moved in, we refinished the red oak flooring, added some recessed lights, and that’s about it. Our design plans are fairly comprehensive […]
[…] baseboards in the first place. We started updating the baseboards in our home after we had all the hardwoods in our home refinished. There were originally 5.5-inch baseboards with matching red oak quarter round (aka shoe molding) […]


")

The Comments
daniel r setnikar
Unless i missed it in the article I didn’t see how you got the redo oak to look white. Did you bleach the floors with a particular agent? If the first photo is the finished product could you kindly elaborate on the process and selection of stains/sealants? That color is exactly what my wife and I are looking for.
Thank you and happy new year!
1021home
→ daniel r setnikarThank you for the question! The Bona NordicSeal acts as a bleach – the more coats you put on, the lighter the floors become. No stains were used on these floors. The sealant we used is Bona HD Traffic and does not affect the color of the wood tone. Thanks!
Robin Vachon
→ 1021homeI am selling my house, which was built in 1950. Almost the entire house has white oak flooring with oil base poly, which as you mentioned has yellowed in the sun after recently being refinished. Here’s the problem: we accidentally purchased red oak to replace the one room that had carpeting. When the contractor we hired separately came to install it, he noticed the wood was different but didn’t say anything. Now we want to refinish the red oak to get it as close as possible to the rest of the house. Sanding and applying oil base poly darkens the red oak, but you can tell the floors are different due to the red veins. Any ideas?
1021home
→ Robin VachonHi Robin – Sorry to hear about this predicament. Honestly, you are probably not going to match white oak and red oak very well when they are placed side by side, especially with an oil finish on the white oak. I know it stinks, but the best option is to probably replace the red oak flooring with white oak. Also, the oil finish on the white oak will yellow as the months/years progress, so even if you match it initially, it will likely not match as the stain matures. The absolute best option here would be to replace the red oak with white oak and sand and refinish all the flooring, then apply a water based stain/finish. That will produce a consistent look and won’t yellow as the sun hits it. Good luck!
Niki Chev
Hello! I love your floors! I am trying to achieve the same color in my home which has red oak floors. I was hoping you could answer a few questions…
Did you use a satin under the nordicseal?
or
Did you leave the floors natural after sanding and then added the two coats of nordic seal and 1 coat of bona HD traffic?
Thanks so much!
1021home
→ Niki ChevThank you for the question! The Nordicseal is similar to a bleach – the more coats you put on the lighter it becomes. We did two coats of that directly on the raw wood (no stain). We then applied the Bona HD Traffic on top of that, and that’s it!
Niki Chev
stain** not satin
Megan Hansen
Do you have any current pictures of your floor that you can share. Or have you notified the floor darken or yellow over time?
1021home
→ Megan HansenThank you for the question! The floor color has remained consistent in the 2 years since we refinished them. Water-based products do not change color with exposure to sunlight, so these floors should remain pretty consistent for years to come. 🙂
Erin Brown
Your floors look beautiful! Thank you for sharing your process. We just added Red Oak to our kitchen and Family Room and will be refinishing the existing floors on the first floor next week. Our contractor planned on using Bona DriFast Stain and I was planning on doing mixture of White/Natural to try to eliminate the pink and yellow tones. Did you try that before deciding to go with the NordicSeal? Sounds like your way may be the easiest way to get this beautiful natural look of white oak. What did you do with your existing banister on your staircase? Did you do this same process on your stairs? I’m considering using a gel stain on the banister and stairs in a gray/brown color, with white balitsters and risers. I would keep my stairs the light oak color, but am afraid the banister won’t match. Our house was built in 1993, so it definitely needs refinished. You ended up using the Satin topcoat, correct?
1021home
→ Erin BrownHi Erin! We did not try the Bona DriFast stain, but we did try other white and gray stains (diluted with water). The problem with those was that it looked “beachy”, like we were whitewashing the floor. The NordicSeal is like a bleach, so it still keeps the wood feel, but removes the red tones. I highly recommend it! We did the same process on the banister and rails. And yes, we used Satin as the topcoat – the matte finish just showed too much dirt (always looked dirty) and we are extremely happy with the satin finish. Good luck with your project!
Moorpark
Thank you so much for this article It helped me so much in my decision making.
1021home
→ MoorparkYou are so welcome! Glad it helped you out!
Ramaiah Chowdary Gummalla
we are in the process of putting new read oak hardwood floors due to water damage and sand & stain the rest of the floor which are already installed. we had darker ( antique brown) before and we would like to go with the same approach like you guys did ( bleach the read oak) and we would like to go for grey stain as well. Does this work ? Also we would like to paint walls. what type of paint and finish have you used on the walls
1021home
→ Ramaiah Chowdary GummallaThank you for the questions! I don’t know if that will work as we only did this approach on red oak and used the Bona NordicSeal and Bona HD Traffic. I suggest working with your flooring contractor to explore your options using this approach and the gray stain you mentioned. For our paint throughout our house, you can find the full list in this blog post: /paint-for-the-arched-manor/ Thanks!
Liz
I’m so glad I can across your post! Now I know exactly what to tell our flooring contractor when we’re ready. 🙂 We want to pair the lightened red oak floor with a crisp white wall just like you did. What paint color did you use? Thanks!
1021home
→ LizThanks for the comment! We used McCormick Super White for our walls and trim. Good luck with your project!
Senthil Desikan
Hi – I see floor differences between old red oak floors having lines in between them due to them having grooves Vs. modern hardwood floors looks like flat surface, how deep did you sand them ? did you attempt to remove the grooves completely, if not possible – how will it look like after finishing, will the guests notice the floor difference between old and new ? Thanks for your comments
1021home
→ Senthil DesikanThanks for the question! Our wood floors were installed 20 years ago, so in comparison to some of the older homes (100+ years, for example), the wood grain and tone match pretty well. We did not have to sand the new wood down too much to match the existing wood. Wood is a natural product and varies in look and tone depending on location, age, exposure to sun, humidity, etc. One thing to note is that our floors are sand-in-place planks, so they don’t have the gap between each plank, which may be the “grooves” you are referring to. The grooved flooring would be much harder to match and sand so that it looks consistent. But I recommend you talk to a local flooring expert in your area! 🙂
Senthil Desikan
Hi – I admire the stairs and hand rail colors matching with the hardwood floor. Can you let me know the process you did to sand / refinish the stairs and hand rail. What type of paint or stain was used ? would be helpful to know – the brand name of stain / paint colors. Thanks
Joselyn Lyons
→ Senthil DesikanI am also wondering this, please. Thank you!
1021home
→ Joselyn LyonsJust answered above! 🙂
1021home
→ Senthil DesikanWe used the exact same products and application procedures for the stairs and handrails. Thanks!
Simone
Hi! I absolutely love your floors! I’m in the process of trying to find someone to do this to my red oak floors.
Contractors are all discouraging me telling me my floor will be pink. I absolutely want the look of your floors!
Is 1 coat of HD traffic enough? Thanks wish me luck!! 🙂
1021home
→ SimoneThanks for the comment! I would suggest you have your contractors tape off a couple 3×3 areas on your floor and in the first square, use two coats of Bona NordicSeal. In the second, use three coats, and then compare the two. The more coats you put on, the lighter it gets. The Bona HD Traffic won’t change the color/tone, and one coat was OK for us. Hope that helps!
Our Dining Room Design Plans for The Arched Manor!
[…] the polished brass switch covers, and removed the lovely window treatments. When we moved in, we refinished the red oak flooring, added some recessed lights, and that’s about it. Our design plans are fairly comprehensive […]
Easy to Install Custom Baseboard Trim – Arched Manor
[…] baseboards in the first place. We started updating the baseboards in our home after we had all the hardwoods in our home refinished. There were originally 5.5-inch baseboards with matching red oak quarter round (aka shoe molding) […]