

Custom molding is one of those projects that not only completely changes the vibe of the room, but is easy to do yourself AND relatively affordable. The ‘bang for your buck’ factor is through the room if you DIY it, and we LOVE to install it whenever and wherever we can. For our theater room, the walls were a tad boring – they had generic baseboards and crown molding, but the walls are 12 feet high and desperately needed some visual interest. Installing picture frame molding in this room was a no-brainer…Home Depot here we come!
We went with a slightly thicker style of molding (from you guessed it, Home Depot) that gave us a more dramatic look. Our picture “frames” are tall and wide and generic picture frame molding would have looked too “dinky” given the scale.
Tip: If it’s available, purchase your molding with primer already applied.
This will save you a step later on since you won’t have to prime. For the baseboards, we went with a custom two-piece combination: an 8-inch pre-primed base with a colonial trim on top.
Tip: If there is any chance for your baseboards to come in contact with moisture, then always use real wood and not MDF (which will bloat when it gets wet).
For the crown molding, we went with a two-piece combo of baseboard trim flipped upside down, and a piece of basic crown molding on top. This gives a more substantial look to the crown molding.
The reason I mention these now is because we needed the height of the baseboards and the crown in order to determine the height of our picture frame molding boxes. This was actually a challenging part of the process – we had a wall of studs, and we wanted the two sconces on that wall to be in the very middle of two of the boxes, which meant we needed to know the exact measurements for the boxes before drywall and trim (yikes!).
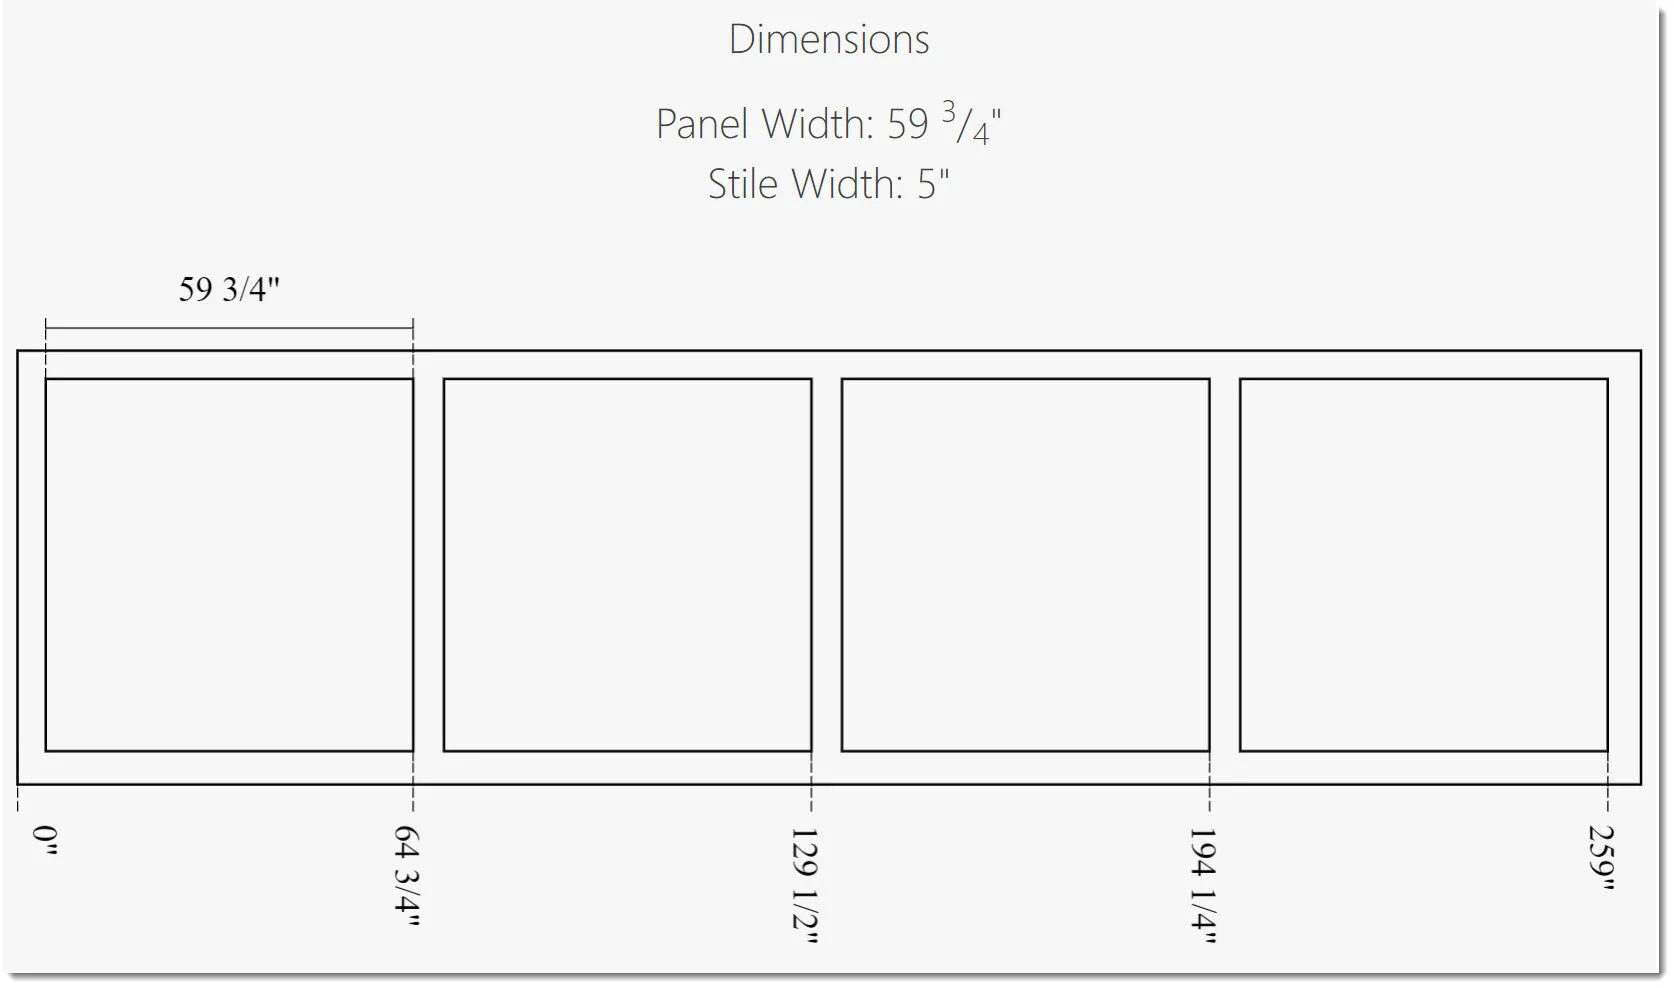
Tip: use a tool on the web to help you with the math to get your spacing right.
I recommend the Picture Frame Molding Calculator, a free tool that will give you a diagram of your wall (example below). Since we only had studs on one of the walls, we ran a piece of painter’s tape across the wall and marked where the molding would be. This allowed us to wire the light boxes where we needed them so that they were centered in their respective box.
The install process is pretty easy if you have the right tools. These include a level, an air compressor, finish nail gun, construction adhesive, caulk, sandpaper, wood filler, and a miter saw. There will be a future blog post with details on how to install it, but for now, here are a few helpful tips:
- Use construction adhesive AND nails to secure the molding to the drywall. Just using nails may allow the molding to come loose down the road, especially in a room with a lot of vibration, like a theater room.
- Fill the nail holes with wood putty, not caulk. It’s more work and time, since you have to sand the putty once it’s dry, but this will give you a smooth look. Caulked holes will show a “divot” once the caulk dries (also famous for expanding and contracting in winter and summer).
- Use a level! Many people recommend using a wood block to get the spacing between the molding boxes, but that assumes your baseboards and doors are perfectly level and plum, which most times is not the case. Using a long level to pencil in your boxes on the drywall (or a laser level if you are fancy) ensures your boxes are level.
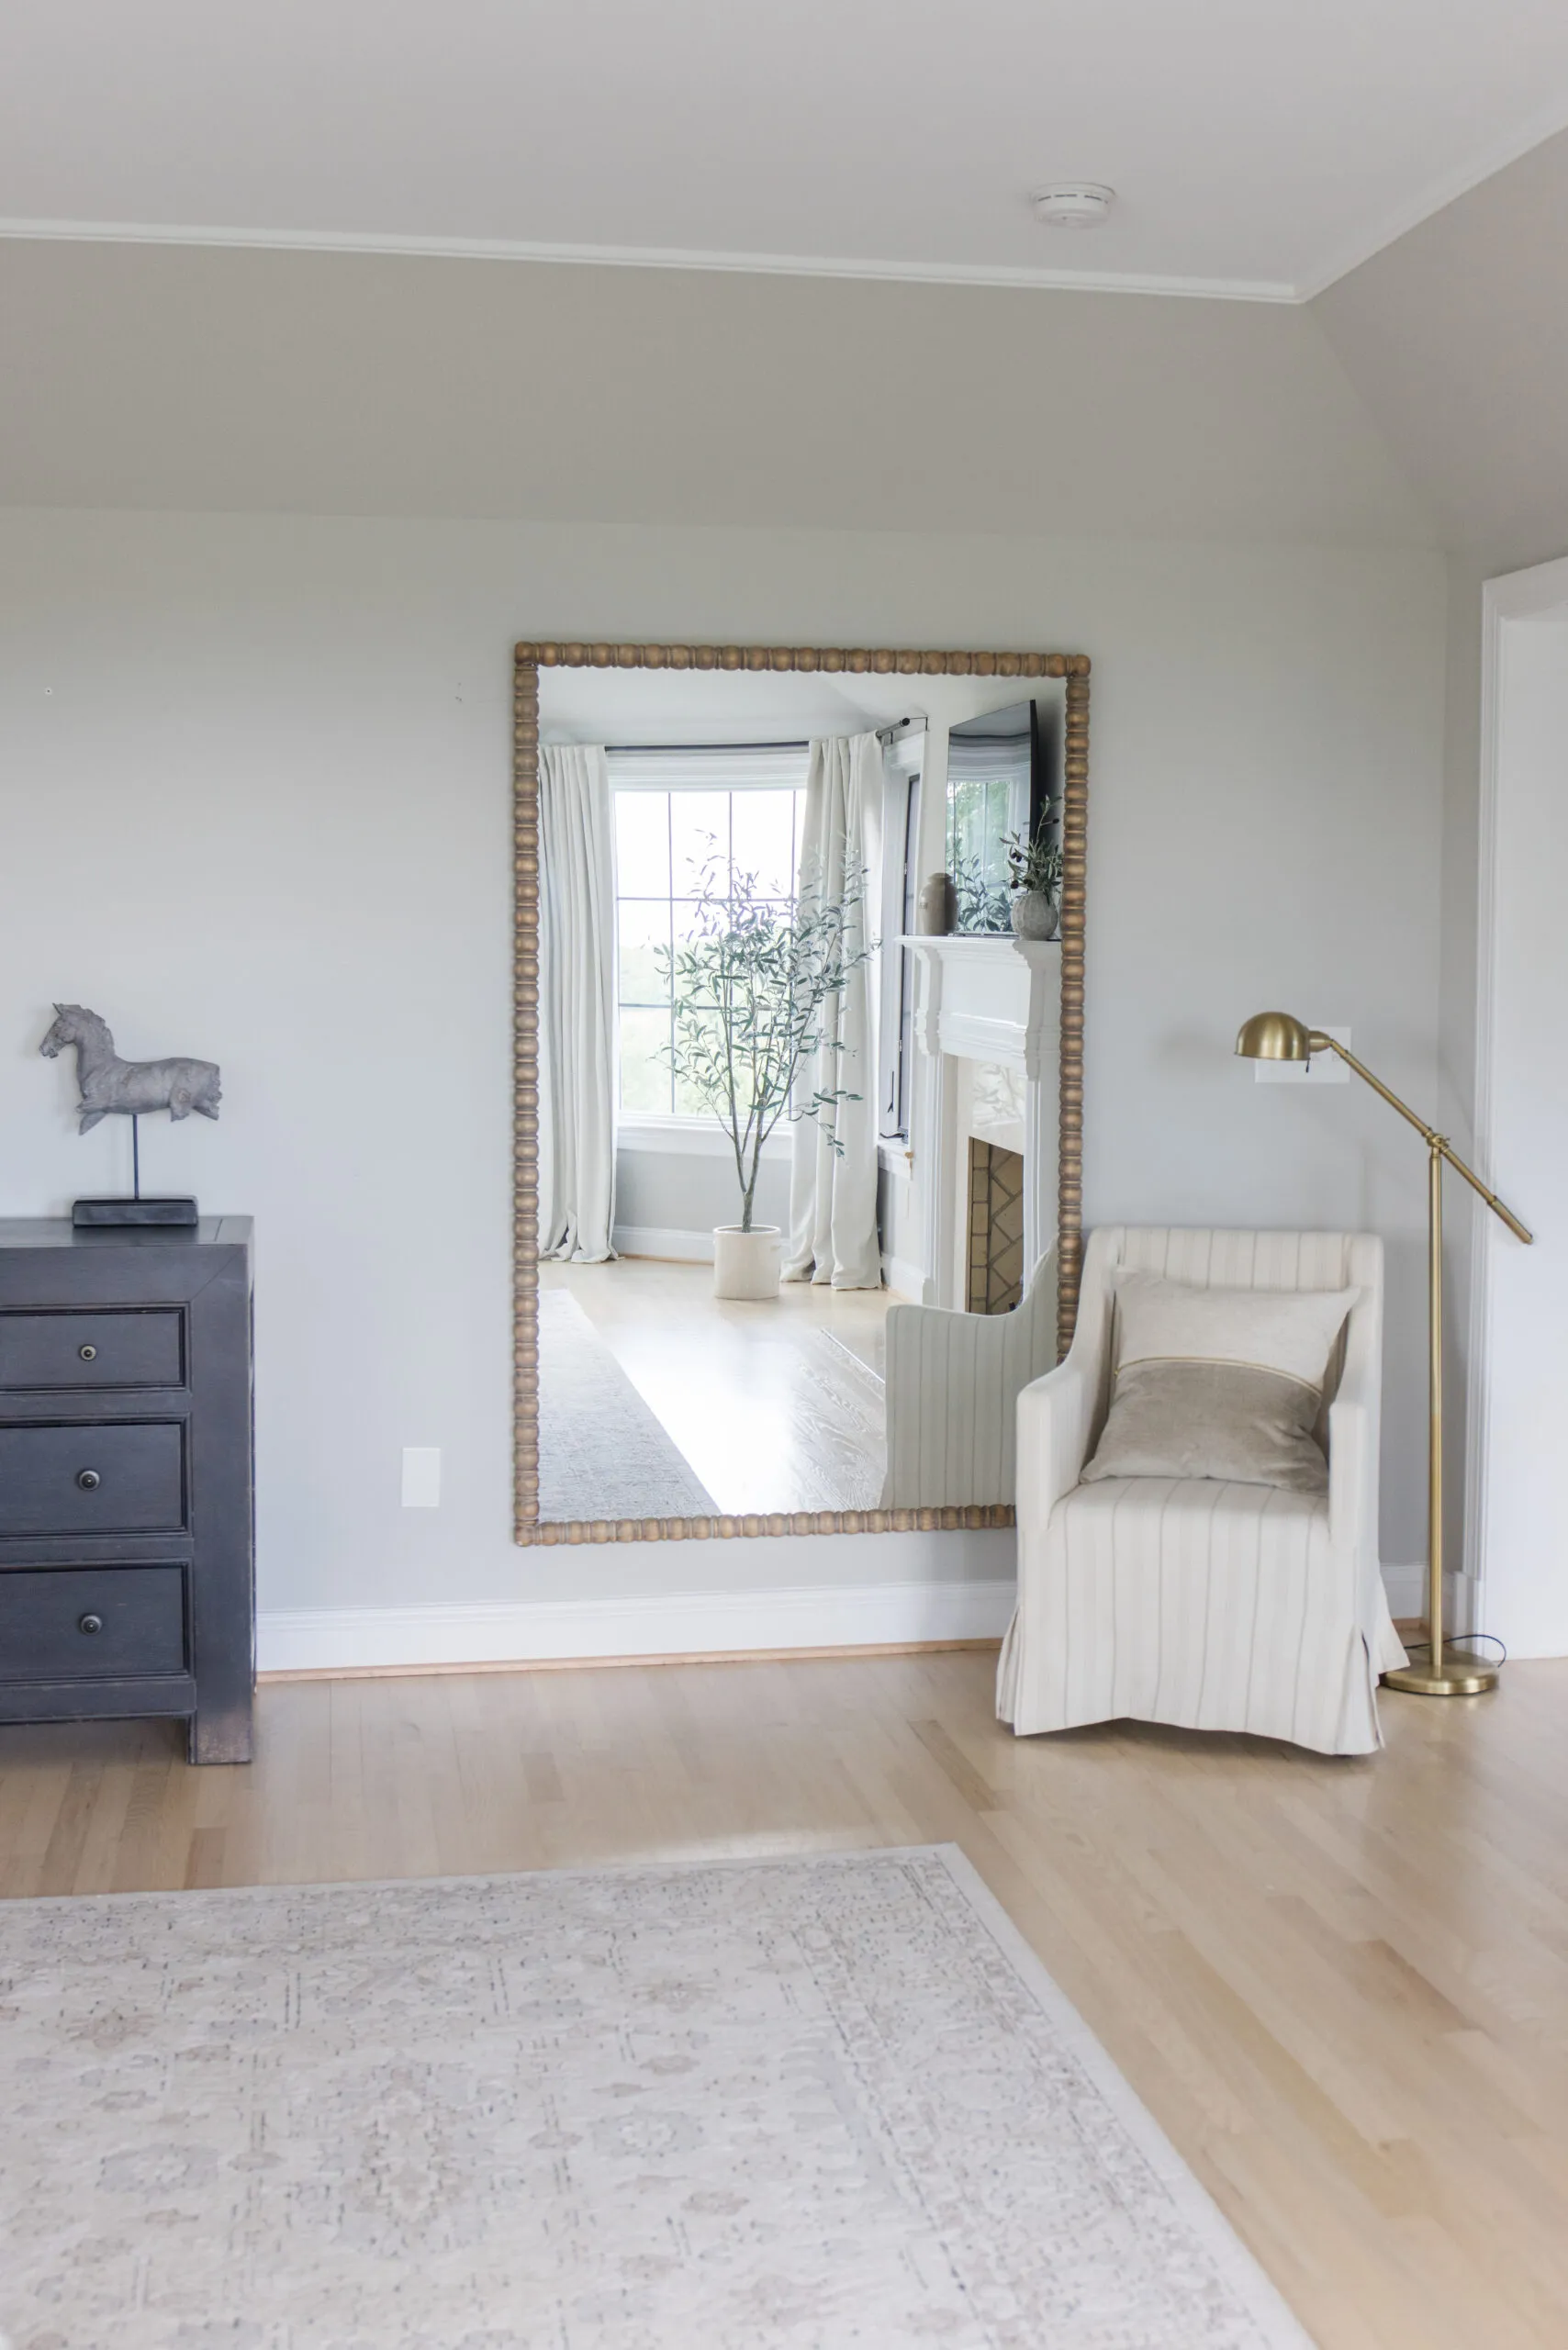
Once your boxes are up, give them a couple coats of paint and your room will be completely transformed! We recommend painting your trim and walls the same color and sheen (satin or eggshell) to get that casual, modern look on formal picture frame molding. This gives the formasual look that we absolutely love! For the final results of our theater room with before and after pictures, check out our theater blog post.
Disclosure: We are happy to share products and links with you! Some of the links in this post are affiliate links and if you use them to make a purchase, we may earn a small commission on the sale. This helps us fund the reoccurring fees and expenses that go along with running a blog site.


")

The Comments
Theater Room Renovation – The Arched Manor – Arched Manor
[…] a picture frame molding pattern to give the walls some depth and visual interest. Check out this blog article about how we installed […]